本文简要介绍基于Nginx反向代理,建立Google镜像的步骤。
1. 准备一个可以访问google的服务器
可以考虑申请一个访问google不受限的云服务器,比如亚马逊。
2. 下载源码
wget https://codeload.github.com/openssl/openssl/zip/OpenSSL_1_1_0e -O OpenSSL_1_1_0e.zip

wget ftp://ftp.csx.cam.ac.uk/pub/software/programming/pcre/pcre-8.39.tar.gz
wget http://zlib.net/zlib-1.2.11.tar.gz

git clone https://github.com/nginx/nginx.git
git clone https://github.com/cuber/ngx_http_google_filter_module
git clone https://github.com/yaoweibin/ngx_http_substitutions_filter_module
pcre版本不要太新,否则后面编译会有问题。
3. 编译安装
进入nginx目录,执行git checkout release-1.13.9选定版本
进入ngx_http_google_filter_module目录,执行git checkout 0.2.0选定版本
进入ngx_http_substitutions_filter_module目录,执行git checkout v0.6.4选定版本
解压其他压缩包后,在nginx根目录下编译安装:
 ./auto/configure --with-pcre=../pcre-8.39 --with-openssl=../openssl-OpenSSL_1_1_0e --with-zlib=../zlib-1.2.11 --with-http_ssl_module --add-module=../ngx_http_google_filter_module --add-module=../ngx_http_substitutions_filter_module

make -j 4

sudo make install
nginx默认安装目录是/usr/local/, 可执行文件/usr/local/nginx/sbin/nginx, 配置文件/usr/local/nginx/conf/nginx.conf
4. 修改nginx配置文件
server {
    server_name localhost;
    listen 80;
    resolver 8.8.8.8;
    location / {
        google on;
    }
}
5. 启动nginx
sudo /usr/local/nginx/sbin/nginx
然后,就可以在浏览器上通过云主机的公网IP地址访问google了。
6. 用域名来访问
目前,我们能通过IP来访问,但是云服务器的IP地址不是固定的,所以, 可以考虑用域名来访问。
域名是之前申请的花生壳的一个免费域名。为了在IP地址变化时动态更新域名对应的IP地址,需要在服务器上定时检测IP地址的变化,并在变化的时候更新域名信息。
这里吐槽下花生壳在Linux下的官方客户端,试了几个版本,折腾了半天,最终还是无法使用。 我们通过下面的脚本来执行IP变化检测,并且在变化的时候更新域名信息。 并加入crontab 任务定时执行。
https://github.com/sigusr1/ph-ddns.git
7. 域名备案???
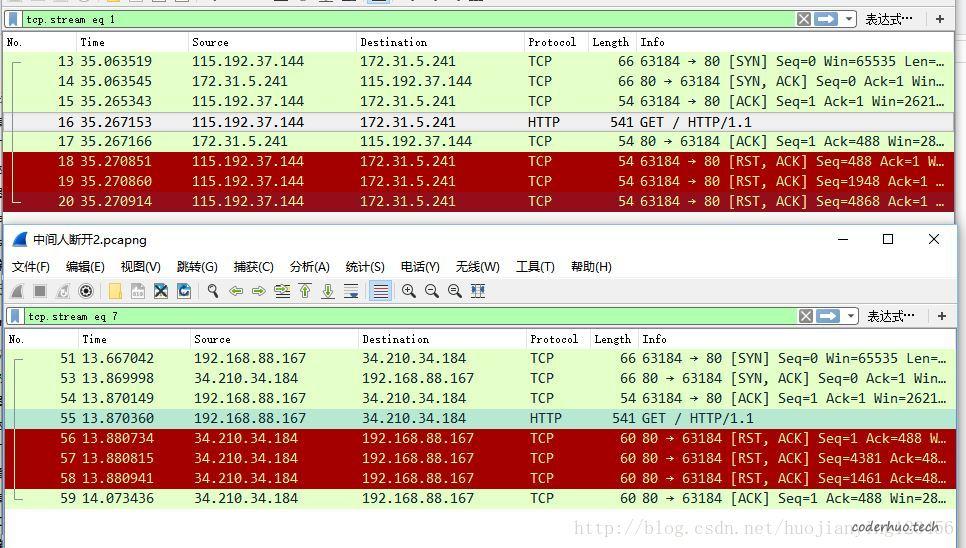
到这里,ping 域名也能正常ping通,域名对应的IP地址也正确,按理说至此域名已能正常工作。 遗憾的是,通过IP可以正常访问,通过域名就不可以。 在服务端和客户端抓包可以看到,被和谐了,有个“中间人”同时对Server和Client都发送了RST报文。
网络拓扑如下:

报文如下:

后来了解到,可能是因为域名未备案的原因,被墙了。 但是他们怎么实现的呢,通过IP可以访问,通过域名无法访问,猜测是通过HTTP头部的HOST字段来检测的。
8. 参考文档
https://www.meanevo.com/2015/08/20/mirrors-google-on-nginx/
http://linuxtools-rst.readthedocs.io/zh_CN/latest/tool/crontab.html
